> ## Documentation Index
> Fetch the complete documentation index at: https://docs.mago.studio/llms.txt
> Use this file to discover all available pages before exploring further.
# Viewport and comparison
# Viewport & Comparison Tools
[← Timeline & tracks](/guide/timeline-and-tracks) · [User Guide](/guide/overview) · [Next: Prompting guide →](/guide/prompting-guide)
***
The viewport is the central preview area. It plays video, displays comparison views, and exposes frame-level tools.
It also includes the **Settings Panel and Render Info** tabs on the left — see [the dedicated section below](#settings-panel--render-info).
## View modes
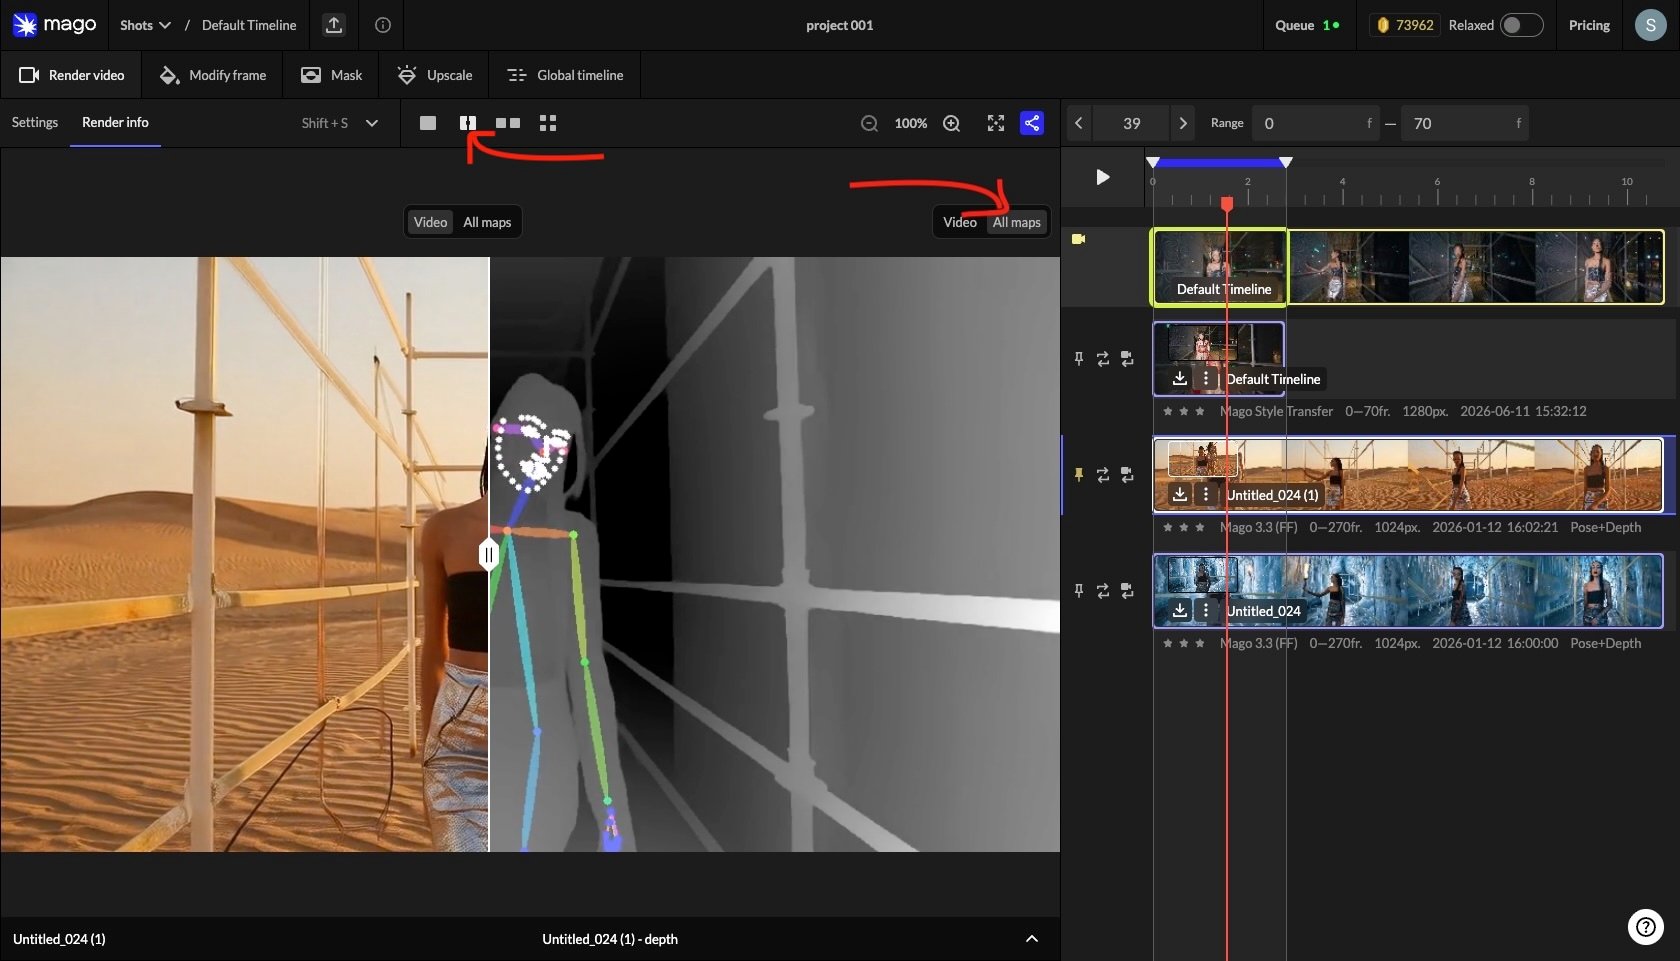
A row of buttons at the top of the viewport switches view configurations:
| Mode | Description | Activation |
| ---------------- | ------------------------------------------------ | --------------------------------------------------------------------- |
| **Single** | One video at a time. Default. | Click the single-view button. |
| **Split slider** | Two videos with an interactive draggable slider. | Select two tracks (click + Ctrl-click), then the split-slider button. |
| **Side-by-side** | Two videos next to each other. | Select two tracks, then the side-by-side button. |
| **Compare 4** | Up to four videos in a 2×2 grid. | Select three or four tracks, then the 4-up view. |
The source track can be compared against any render — use this to verify how much the render changed.
 ## Settings difference display
A chevron at the bottom-right of any comparison view expands a panel showing the **differences in settings** between the compared renders. Useful for understanding *why* two outputs look different: was it the prompt, the seed, the steps, the ControlNet?
## ControlNet visualization
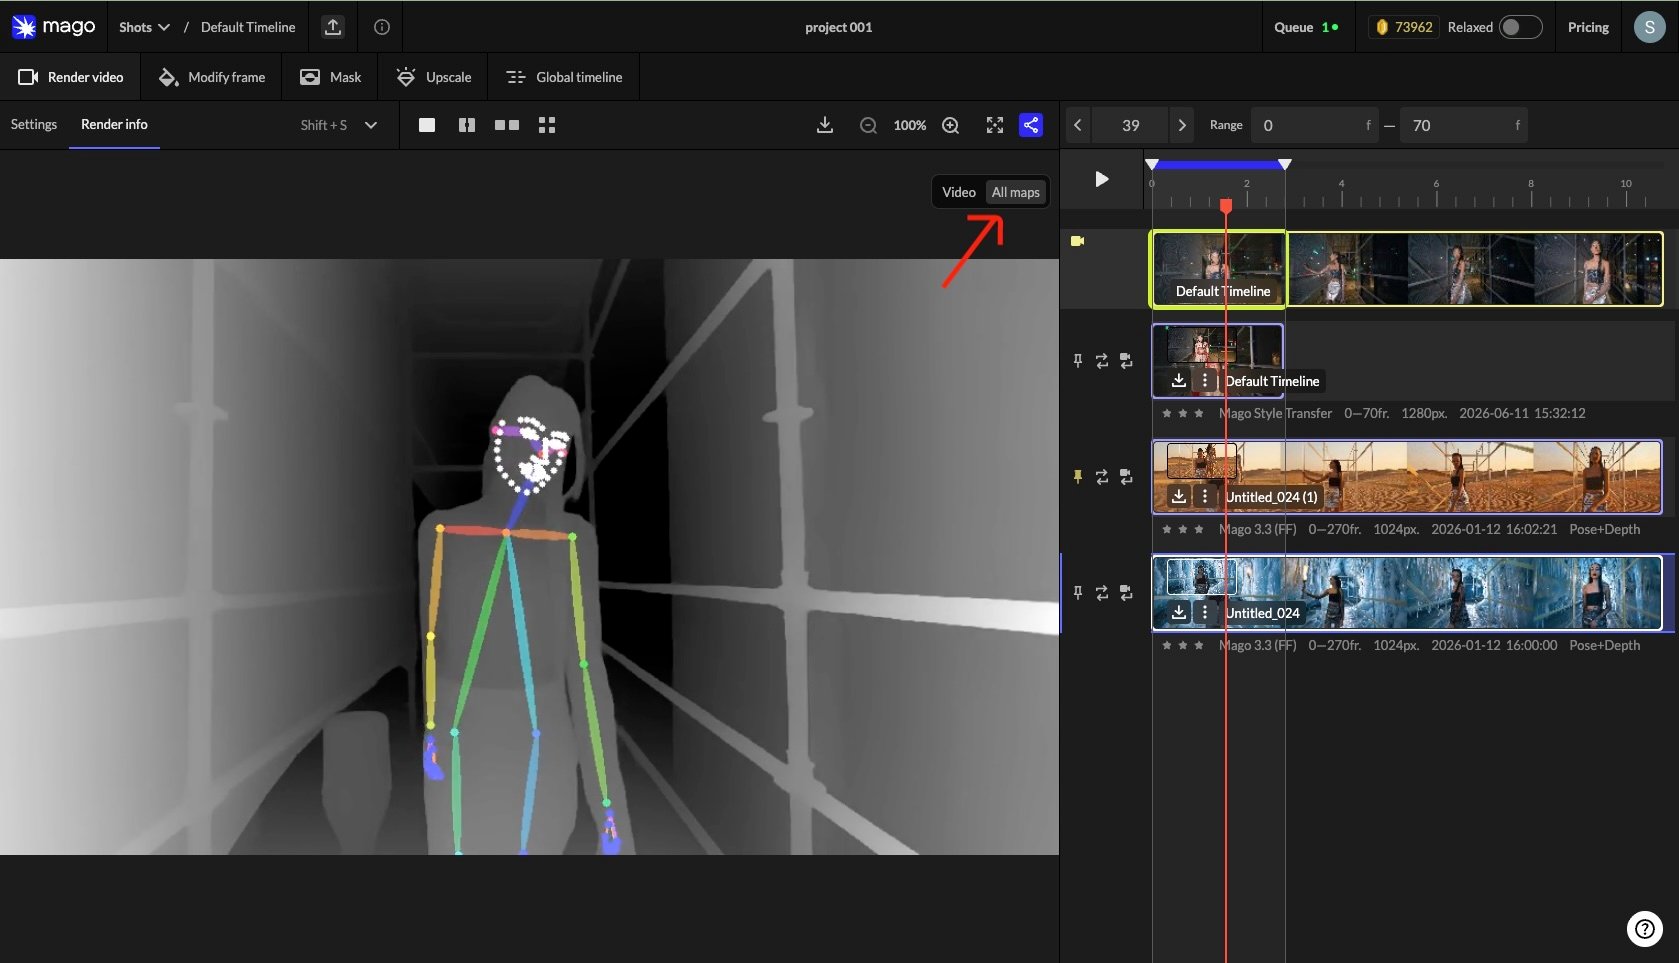
For models with ControlNets, the viewport can overlay the active ControlNet map (depth, softedge, pose, depth+pose) alongside the render. Activated from the top-right of the comparison view.
> **📐 Design principle** — Mago exposes flaws rather than hiding them. Deep zoom, ControlNet visualization, and frame-level inspection are intentional. They help you understand what the model is doing and why, which leads to better refinement.
This is one of Mago's signature debugging features. Common diagnoses from the ControlNet map:
* Pose tracking failing because the source has occlusion.
* Depth ambiguity in low-contrast scenes producing flat output.
* SoftEdge picking up too much texture detail, over-constraining the model.
## Settings difference display
A chevron at the bottom-right of any comparison view expands a panel showing the **differences in settings** between the compared renders. Useful for understanding *why* two outputs look different: was it the prompt, the seed, the steps, the ControlNet?
## ControlNet visualization
For models with ControlNets, the viewport can overlay the active ControlNet map (depth, softedge, pose, depth+pose) alongside the render. Activated from the top-right of the comparison view.
> **📐 Design principle** — Mago exposes flaws rather than hiding them. Deep zoom, ControlNet visualization, and frame-level inspection are intentional. They help you understand what the model is doing and why, which leads to better refinement.
This is one of Mago's signature debugging features. Common diagnoses from the ControlNet map:
* Pose tracking failing because the source has occlusion.
* Depth ambiguity in low-contrast scenes producing flat output.
* SoftEdge picking up too much texture detail, over-constraining the model.
 ## Viewport tools
| Tool | Action |
| ------------------------ | ------------------------------------------------------------------------------------------------------------------------ |
| **Download frame** | Save the current frame as an image. |
| **Zoom in / out** | Adjust zoom; pan when zoomed. Plays at any zoom level. |
| **Fullscreen** | Open the viewport at maximum size for detailed review. |
| **Share (download SBS)** | Download a side-by-side comparison video from the current view configuration. For client review and social distribution. |
***
## Settings Panel & Render Info
The left panel has two tabs: **Settings** (for the next render) and **Render Info** (for inspecting an existing track).
### Settings tab
Holds the parameters for the next render in the active workspace. The active workspace and chosen model determine what controls appear. Shared elements across most workspaces:
* Source video selector (Render Video, Mask, Upscale) or source frame selector (Modify Frame).
* Preset selector.
* Model selector.
* Basic, Advanced, and sometimes ControlNets sub-tabs.
* **Copy** and **Paste** buttons to transfer settings between tracks, shots, or projects.
* Generate buttons (with credit cost) at the bottom.
### Render Info tab
## Viewport tools
| Tool | Action |
| ------------------------ | ------------------------------------------------------------------------------------------------------------------------ |
| **Download frame** | Save the current frame as an image. |
| **Zoom in / out** | Adjust zoom; pan when zoomed. Plays at any zoom level. |
| **Fullscreen** | Open the viewport at maximum size for detailed review. |
| **Share (download SBS)** | Download a side-by-side comparison video from the current view configuration. For client review and social distribution. |
***
## Settings Panel & Render Info
The left panel has two tabs: **Settings** (for the next render) and **Render Info** (for inspecting an existing track).
### Settings tab
Holds the parameters for the next render in the active workspace. The active workspace and chosen model determine what controls appear. Shared elements across most workspaces:
* Source video selector (Render Video, Mask, Upscale) or source frame selector (Modify Frame).
* Preset selector.
* Model selector.
* Basic, Advanced, and sometimes ControlNets sub-tabs.
* **Copy** and **Paste** buttons to transfer settings between tracks, shots, or projects.
* Generate buttons (with credit cost) at the bottom.
### Render Info tab
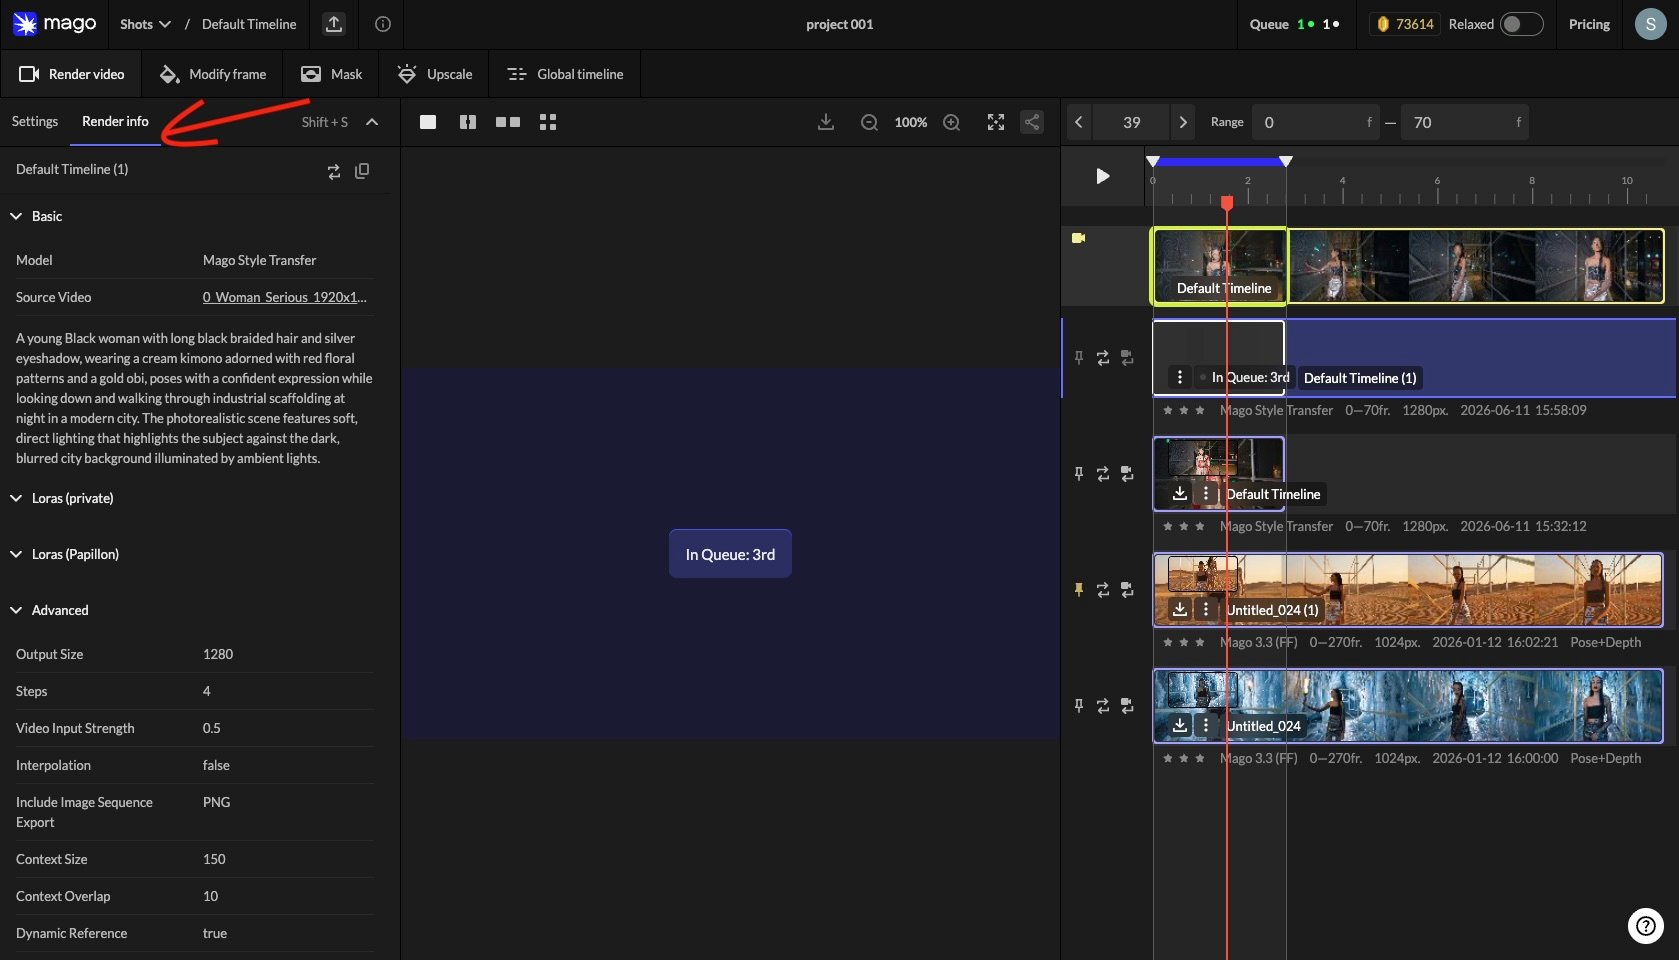 Shows metadata for the currently selected render, mask, or upscale track:
* Prompt used.
* All settings applied during the render.
* Source video reference.
* Reference frames or images used.
* Model and version.
Use it to diagnose why two similar renders behave differently, recreate a configuration on another shot, or document settings for production review.
### Copy & paste settings
Settings transfer between tracks, shots, and even projects. Three places to do it:
1. **Reuse Settings** button on the track — loads settings into the panel for editing.
2. **Render Info → Copy Settings** — copies the full settings package.
3. **Settings panel Copy/Paste** — transfer within or across shots.
Settings can also be shared as text — handy for applying a style across shots, recreating a config in a new project, or sending settings to a teammate or the support team.
### Panel toggle
**Shift + S** toggles panel visibility (also via the chevron at the panel edge). Useful when you want a larger viewport.
***
[← Timeline & tracks](/guide/timeline-and-tracks) · [User Guide](/guide/overview) · [Next: Prompting guide →](/guide/prompting-guide)
Shows metadata for the currently selected render, mask, or upscale track:
* Prompt used.
* All settings applied during the render.
* Source video reference.
* Reference frames or images used.
* Model and version.
Use it to diagnose why two similar renders behave differently, recreate a configuration on another shot, or document settings for production review.
### Copy & paste settings
Settings transfer between tracks, shots, and even projects. Three places to do it:
1. **Reuse Settings** button on the track — loads settings into the panel for editing.
2. **Render Info → Copy Settings** — copies the full settings package.
3. **Settings panel Copy/Paste** — transfer within or across shots.
Settings can also be shared as text — handy for applying a style across shots, recreating a config in a new project, or sending settings to a teammate or the support team.
### Panel toggle
**Shift + S** toggles panel visibility (also via the chevron at the panel edge). Useful when you want a larger viewport.
***
[← Timeline & tracks](/guide/timeline-and-tracks) · [User Guide](/guide/overview) · [Next: Prompting guide →](/guide/prompting-guide)