> ## Documentation Index
> Fetch the complete documentation index at: https://docs.mago.studio/llms.txt
> Use this file to discover all available pages before exploring further.
# App layout
# Application Layout
[← Getting Started](/guide/getting-started) · [User Guide](/guide/overview) · [Next: Projects, Shots & Renders →](/guide/projects-shots-renders)
***
The Mago editor is a single-page application organized into five persistent surfaces. Knowing where each lives makes the rest of the documentation easier to navigate.
```mermaid theme={null}
flowchart TB
TB[Top bar — project nav, credits, mode, queue, account]
WT[Workspace tabs — Render Video · Modify Frame · Mask · Upscale · Global Timeline]
subgraph Editor
LP[Left panel
Settings + Render Info]
VP[Viewport
preview & comparison]
TL[Timeline
source + render tracks]
end
TB --> WT --> Editor
LP --- VP --- TL
```
| Surface | Location | Purpose |
| ------------------ | ----------------- | ------------------------------------------------------------------------------------ |
| **Top bar** | Top of screen | Project navigation, share, credit balance, mode toggle, pricing, queue, account menu |
| **Workspace tabs** | Below the top bar | Switch between the five workspaces |
| **Left panel** | Left side | Settings for the next render, and Render Info for inspecting any track |
| **Viewport** | Center | Video preview, comparison views, frame navigation, zoom, downloads |
| **Timeline** | Right side | Vertical timeline: the source track and all render tracks for the current shot |
## Top bar
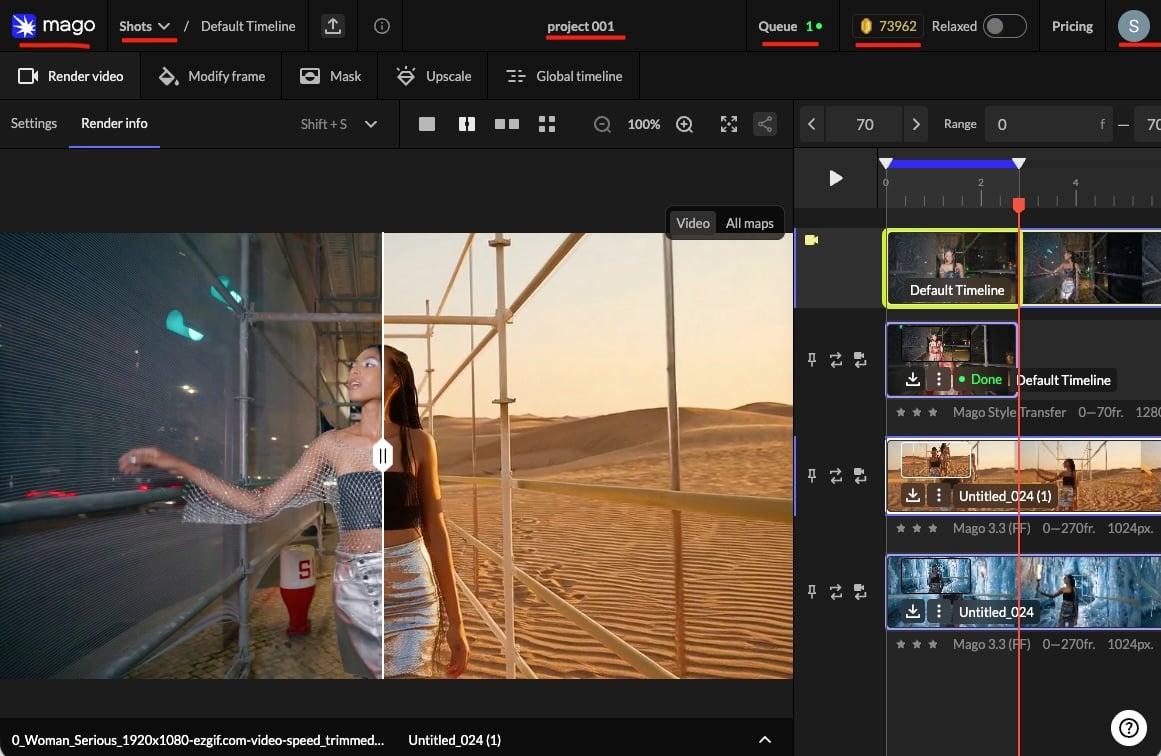 * **Mago logo** — returns to the home view from anywhere.
* **Project name** — the current project. Click to navigate.
* **Shot name** — the current shot. Click for the shot list; the ℹ️ icon opens [shot statistics](/guide/projects-shots-renders#project-statistics).
* **Credit balance** — real-time available credits. Updates after each render.
* **Relaxed toggle** — switches between Credits mode and [Relaxed mode](/guide/credits-plans-modes#relaxed-mode). Greyed out on the Free plan.
* **Pricing** — opens the plans and credit packs page.
* **Queue** — counter of in-progress and waiting jobs. Click to expand the [full queue](/guide/credits-plans-modes#the-queue).
* **Account avatar** — account menu (settings, billing, support).
## Workspace tabs
The five tabs determine the task being performed. Settings, viewport content, and timeline behavior all change with the active tab.
| Tab | Icon hint | Use for |
| ---------------------------------------------------- | -------------------------------- | ---------------------------------------------- |
| [Render Video](/guide/workspaces/render-video) | Video camera | Video-to-video generation. The main workspace. |
| [Modify Frame](/guide/workspaces/modify-frame) | Paint bucket | Keyframe or reference frame generation |
| [Mask](/guide/workspaces/mask) | Contrasted circle in a rectangle | Mask generation for use with Inpainting |
| [Upscale](/guide/workspaces/upscale) | Bright gem | Resolution and detail enhancement |
| [Global Timeline](/guide/workspaces/global-timeline) | Horizontal editing bars | Cross-shot review using pinned renders |
> 📸 **Screenshot needed:** `app-layout/workspace-tabs.png`
> *The five workspace tabs.*
> **💡 Tip** — Switching workspaces never loses work. Settings configured in one workspace are preserved when you return, and renders remain visible as tracks. Use **Edit this Render** on a track to carry a render into another workspace as the new source.
The left panel and viewport are detailed in [Timeline & tracks](/guide/timeline-and-tracks) and [Viewport & comparison](/guide/viewport-and-comparison).
***
[← Getting Started](/guide/getting-started) · [User Guide](/guide/overview) · [Next: Projects, Shots & Renders →](/guide/projects-shots-renders)
* **Mago logo** — returns to the home view from anywhere.
* **Project name** — the current project. Click to navigate.
* **Shot name** — the current shot. Click for the shot list; the ℹ️ icon opens [shot statistics](/guide/projects-shots-renders#project-statistics).
* **Credit balance** — real-time available credits. Updates after each render.
* **Relaxed toggle** — switches between Credits mode and [Relaxed mode](/guide/credits-plans-modes#relaxed-mode). Greyed out on the Free plan.
* **Pricing** — opens the plans and credit packs page.
* **Queue** — counter of in-progress and waiting jobs. Click to expand the [full queue](/guide/credits-plans-modes#the-queue).
* **Account avatar** — account menu (settings, billing, support).
## Workspace tabs
The five tabs determine the task being performed. Settings, viewport content, and timeline behavior all change with the active tab.
| Tab | Icon hint | Use for |
| ---------------------------------------------------- | -------------------------------- | ---------------------------------------------- |
| [Render Video](/guide/workspaces/render-video) | Video camera | Video-to-video generation. The main workspace. |
| [Modify Frame](/guide/workspaces/modify-frame) | Paint bucket | Keyframe or reference frame generation |
| [Mask](/guide/workspaces/mask) | Contrasted circle in a rectangle | Mask generation for use with Inpainting |
| [Upscale](/guide/workspaces/upscale) | Bright gem | Resolution and detail enhancement |
| [Global Timeline](/guide/workspaces/global-timeline) | Horizontal editing bars | Cross-shot review using pinned renders |
> 📸 **Screenshot needed:** `app-layout/workspace-tabs.png`
> *The five workspace tabs.*
> **💡 Tip** — Switching workspaces never loses work. Settings configured in one workspace are preserved when you return, and renders remain visible as tracks. Use **Edit this Render** on a track to carry a render into another workspace as the new source.
The left panel and viewport are detailed in [Timeline & tracks](/guide/timeline-and-tracks) and [Viewport & comparison](/guide/viewport-and-comparison).
***
[← Getting Started](/guide/getting-started) · [User Guide](/guide/overview) · [Next: Projects, Shots & Renders →](/guide/projects-shots-renders)